How Otter is Built
Otter is a P2P video calling solution that can easily be integrated into new or existing web applications by developers. Otter’s infrastructure is deployed to the AWS Cloud and relies heavily on the serverless paradigm.
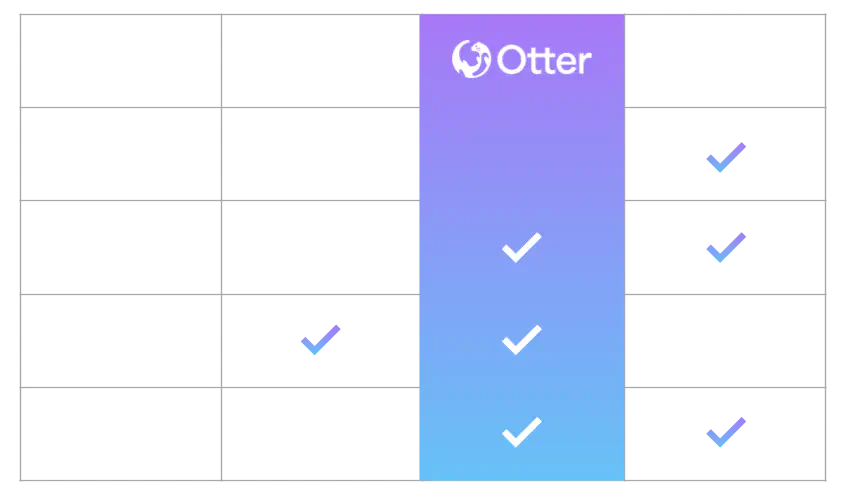
Otter is composed of the following:
- An easy-to-use CLI that automates the deployment and tear-down of the infrastructure.
- A minimalistic API to allow developers to integrate Otter’s functionality within their own web application.
- A simple web application for P2P calls with audio and video, instant messaging and file exchange.
The real beauty of using Otter is that prior knowledge of WebRTC is not required!
Architecture Overview
Next, we will explore the design decisions of how we built Otter. We split this exploration into three overall design objectives:
- Provisioning the infrastructure to support video calling.
- Abstracting away the complexity of interacting with this video calling infrastructure.
- Allowing developers to integrate Otter into their applications.
We segmented the architecture into logical groupings of components that together fulfill these objectives as they interact. We will refer to these groupings as stacks. The four stacks we will discuss are the Signaling stack, the STUN/TURN stack, the Frontend stack and the API stack.
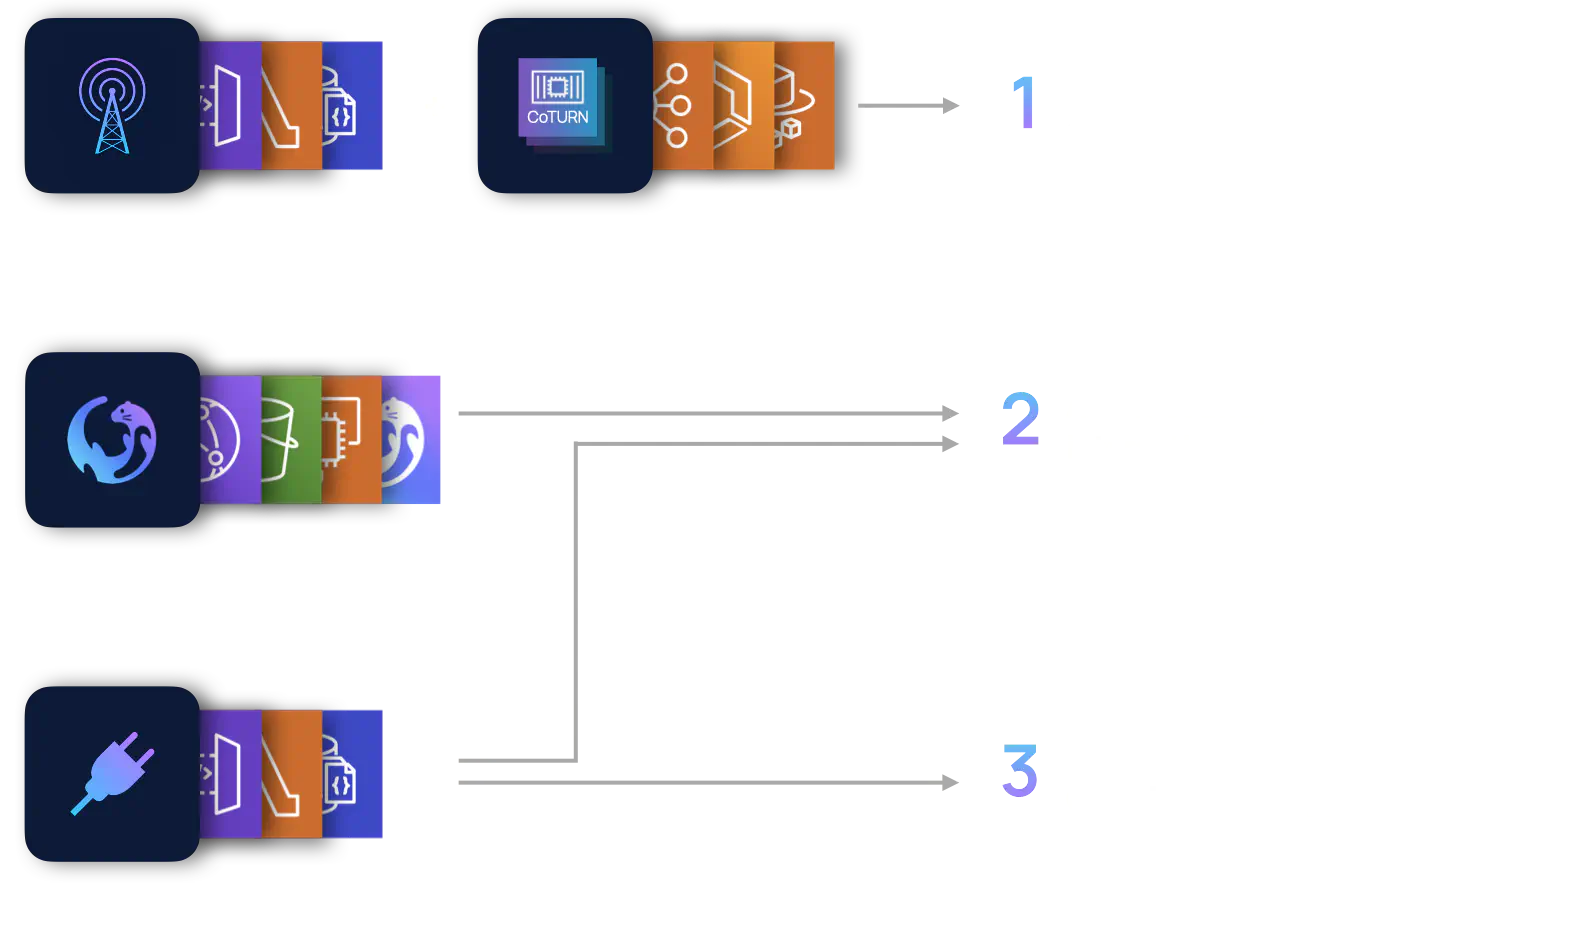
Recall the components we needed for video calling in a P2P manner: a signaling server, a STUN server and a TURN server. The signaling server provides a way for peers to exchange Session Description information, including information provided by the STUN and TURN servers. The Signaling stack and STUN/TURN stack fulfill the first objective: to provide the infrastructure to support video calling.
However, without a way to interact with this infrastructure, a developer would still need to have an understanding of the WebRTC API to develop, test and deploy a video calling application.
The Frontend stack abstracts this complexity away from the developer by providing a video calling application which interacts with the Otter infrastructure. We will refer to this video calling application as the Otter Web App. Built with the WebRTC API and by consuming resources provided by the API stack, the Otter Web App offers audio/video calling, instant messaging, and file sharing between two peers. In addition, the Frontend stack manages hosting the Otter Web App.
To be considered a drop-in framework, developers need an easy way to integrate Otter into their applications. The API stack provides a route that dynamically generates a link to the Otter Web App for this purpose.
Let’s now peer into each stack.
The Signaling Stack
The purpose of the signaling server in the context of WebRTC is to serve as a mechanism to transfer messages between peers. Recall, signaling is not defined in the RFC and instead left to the developer to implement.
We needed our signaling server to have the following qualities:
- Low-latency for a real-time1 application (sub 100ms).
- Asynchronous, two-way communication between client and server.
- Scale to handle connections as needed.
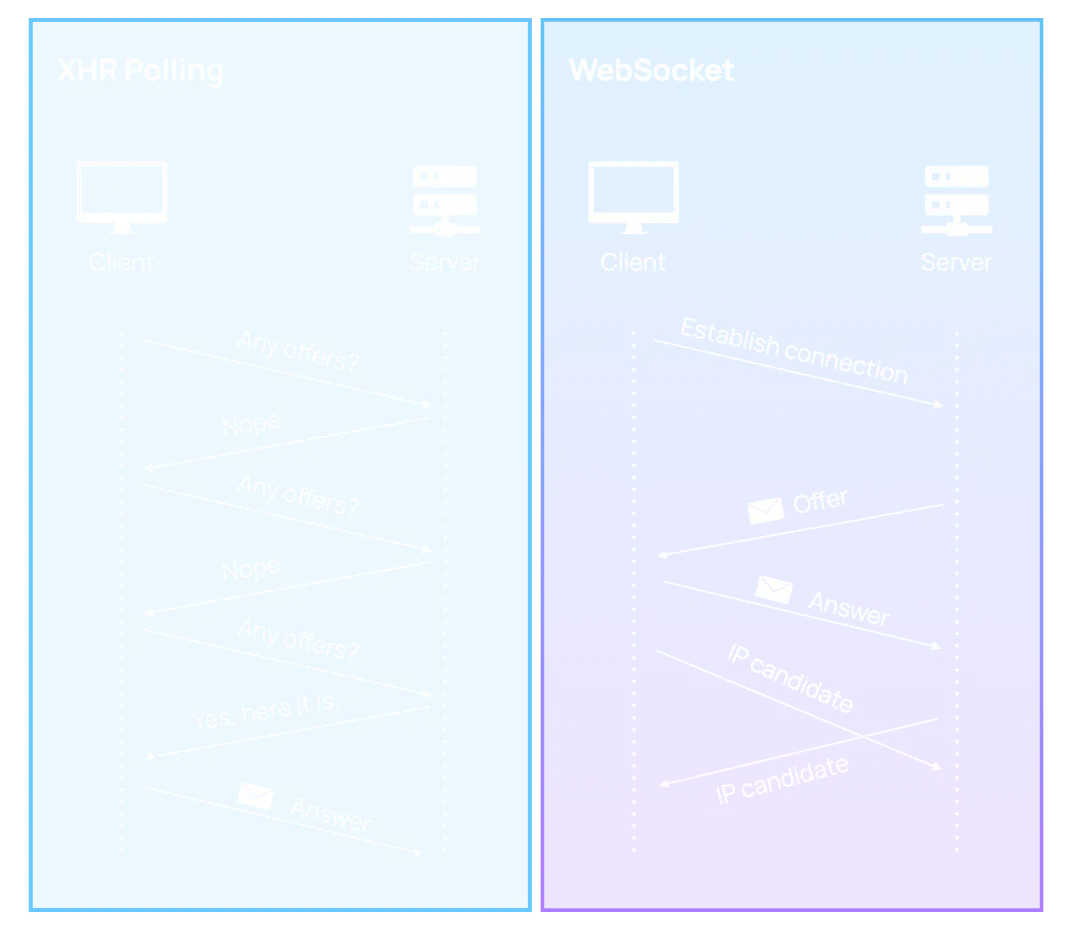
An option we considered was XHR polling, where a client periodically makes requests to the server asking for new data. However, polling “stretch[es] the original semantics of HTTP and that HTTP was not designed for bidirectional communication”.
Instead, the WebSocket protocol was a natural fit given our requirements. The protocol offers bidirectional communication (where the client and server can exchange data asynchronously), low latency (once a connection is established), and no limits on the number of concurrent connections.
Implementing WebSocket Communication Channels
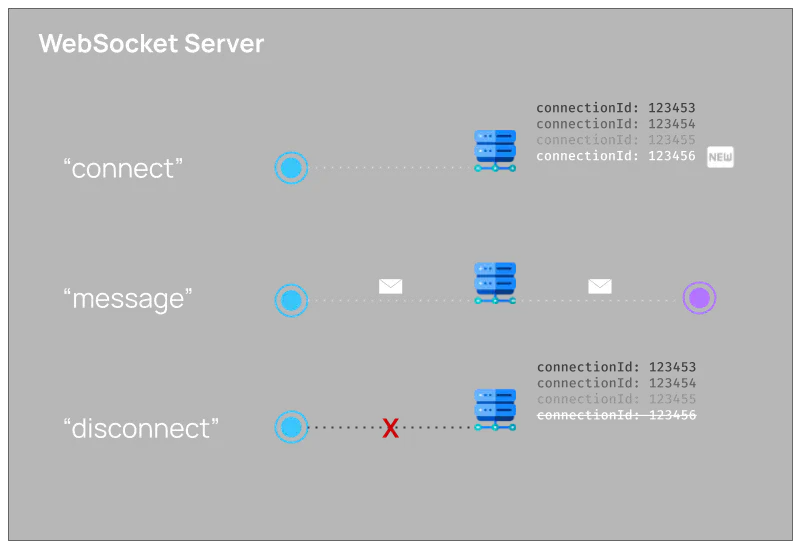
A typical WebSocket server will have the following:
- Event listener for connecting clients and assigning an identifier to each client.
- Event listener for sending messages between clients, using the identifier of each client.
- Event listener for disconnecting clients and deleting the identifier for each client.
Recall the nature of a WebRTC session is that media flows directly from browser to browser. This means once clients (peers) connect to the WebSocket server and pass their initial messages (offers and answers) to their peers to establish the WebRTC session, the WebSocket server typically remains idle. Peers must maintain long-lived connections to the server in the case of subsequent negotiations.
This traffic pattern implies bursts of requests to the WebSocket server on the initial set up of a WebRTC session, and intermittent or irregular requests thereafter. Thus, it would be appropriate for our WebSocket server to be able to handle bursty and irregular traffic on demand.
AWS API WebSocket Gateway was a perfect fit for these requirements and traffic patterns. The gateway would serve as a single endpoint for all clients and it would rely on event listeners to fulfill the functions of connecting clients and assigning identifiers, sending messages between clients using their identifiers, and disconnecting clients and removing their identifiers.
To serve the role of event listeners behind the gateway, we needed a service that would be on demand or event based, easy to manage and auto-scalable. AWS Lambdas were just the fit. Lambdas are a service provided by AWS that offer Functions-as-a-Service. Lambdas are considered serverless since a developer only needs to focus on core application logic, and need not provision nor manage servers that the code would otherwise need to run on. Another option would have been running a server on a EC2 instance, but the Lambdas made more sense given our event based traffic patterns and our approach towards low maintenance infrastructure.
We mapped each event listener to a separate Lambda: one for connecting clients and assigning identifiers; one for passing messages between connected clients; and another for disconnecting clients and removing their identifiers.
We were also able to use a Lambda to authorize access to the gateway, which will be discussed later in the Engineering Challenges.
We can see a natural separation of responsibilities between the WebSocket gateway and the Lambdas. The WebSocket gateway maintains long-lived connections with the clients, whereas the Lambdas are event based and are not regularly invoked after an initial WebRTC session is established. This lends well to their on demand nature.
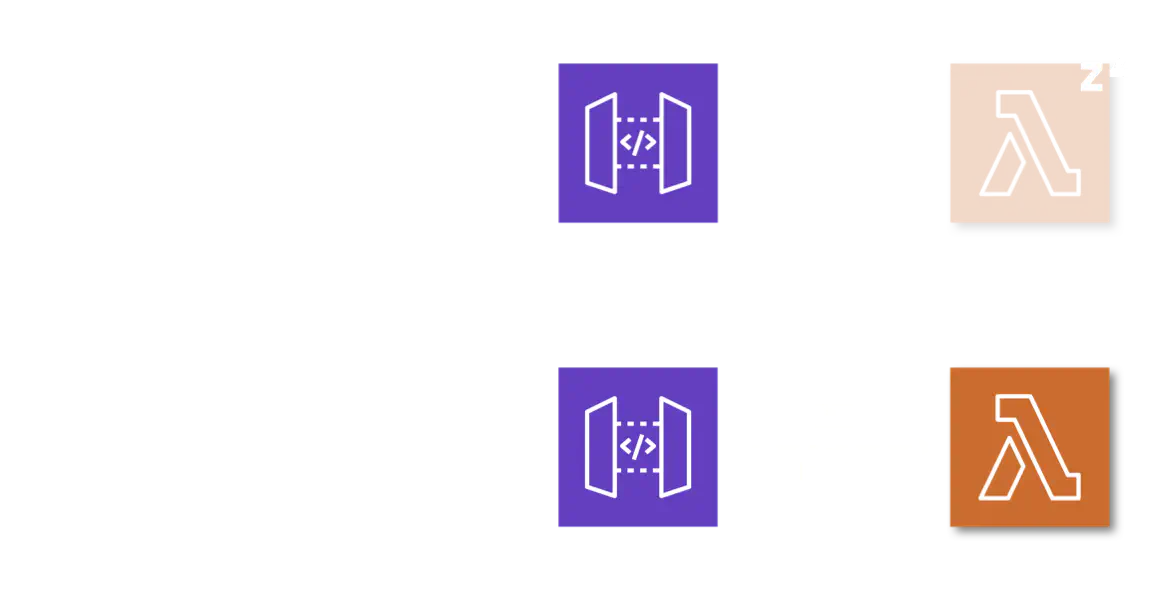
Choosing the API WebSocket gateway came with two tradeoffs:
- The gateway is stateless and needs to persist the identifiers assigned to each connected client.
- The gateway cannot broadcast or send messages to multiple client connections with a single API call.
We were able to mitigate the first tradeoff by employing a database to persist the identifier assigned to each client as a key-value pair in a NoSQL database (DynamoDB) lookup table. The second tradeoff was a non-issue with a P2P topology: there was no need to broadcast messages to more than a few client connections (peers).
Choosing Lambdas came with two tradeoffs:
- Cold starts: latency when a Lambda is first spun up.
- Limited execution time: a Lambda will be torn down after 15 minutes.
These tradeoffs were acceptable considering the overall latency of setting up a WebRTC session was longer than that of the cold start and that each of our function calls to the Lambda were not computationally longer than a second.
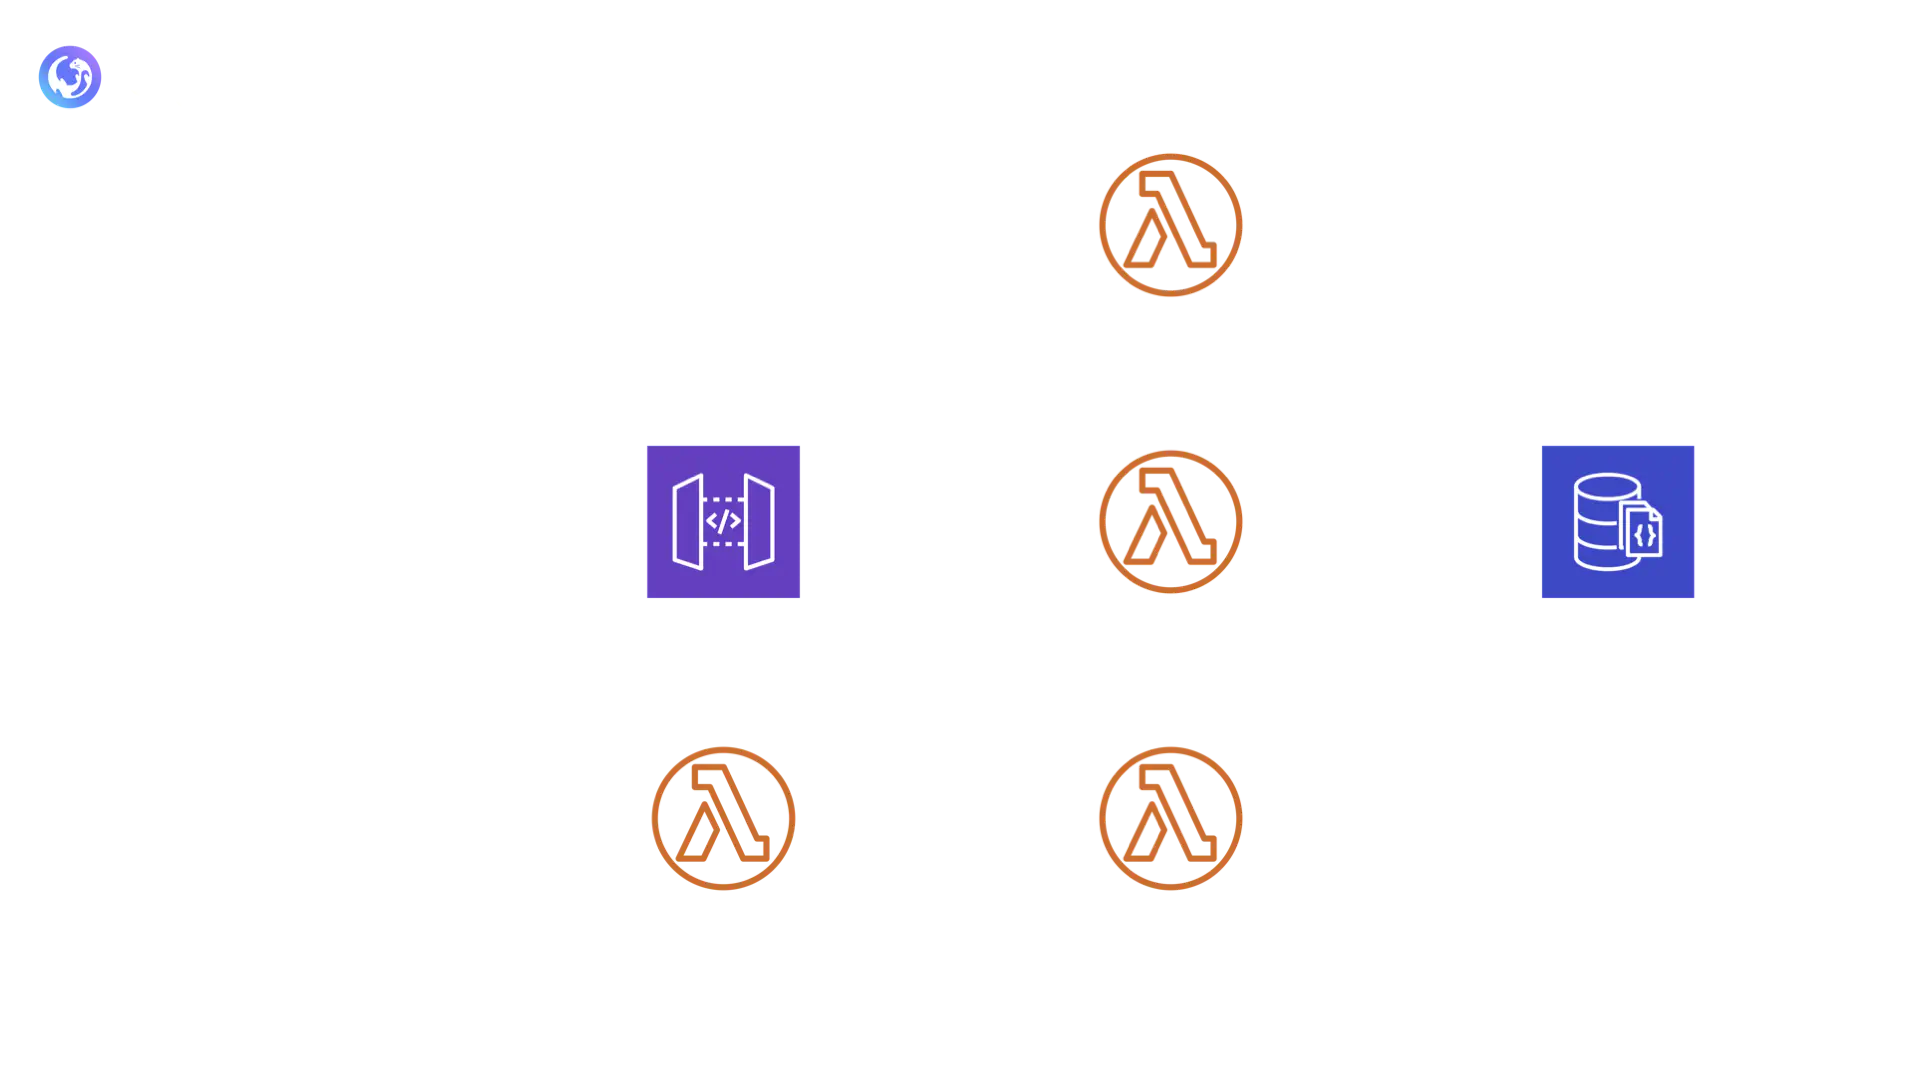
The STUN/TURN Stack
As we have previously discussed, establishing a direct peer-to-peer connection requires traversing multiple layers of NAT devices. Thus, a STUN server is required to allow both peers to acquire their public IP address. Furthermore, a direct connection between peers may not be possible under restrictive network configurations. Thus, a TURN server is required to relay the media for the session when needed.
To deploy a STUN/TURN server, we first needed to decide whether an open-source, a free third-party, or a DIY implementation would fit best within Otter.
Amongst the open-source options is CoTURN. CoTURN provides the functionality required for both STUN and TURN. Having a single component providing both functionalities would reduce the complexity of our infrastructure and its deployment. It is also the most widely used TURN server, open-source or otherwise, and has an active development community.
On the other hand, deploying CoTURN requires non-trivial configuration and the available documentation is limited. Moreover, deploying both STUN and TURN functionality within the same component does remove a degree of freedom, as it is no longer possible to scale one without the other. Considering these benefits and drawbacks, we decided to use CoTURN as it seemed like a natural fit for our application.
Interestingly, there are also publicly available STUN and TURN servers that are free to use. These servers are hosted by third-party providers such as Google. We decided against this option for two reasons: the inherent uncertainty around free services and whether or not they will continue to be free or available; and using a third-party TURN server defeats the purpose of a self-contained infrastructure in the context of privacy.
Lastly, we could have implemented a DIY STUN/TURN server, but given the time and complexity associated with this, we decided to focus on the core application functionality.
Deploying CoTURN
We listed the following requirements as must-haves for the deployment of CoTURN:
- Low maintenance.
- A public IP address.
- Ability to scale depending on the traffic load.
With this in mind, we knew that CoTURN needed to be deployed in a serverless fashion to eliminate the maintenance associated with the underlying operating system. Additionally, it needed to be deployed within a public subnet to be able to relay media between peers. It also needed to be able to handle heavier traffic loads, otherwise it could become a bottleneck in the infrastructure if all other stacks auto-scaled and CoTURN did not.
Deploying CoTURN without having to manage the underlying server required a platform where software could run within a container. AWS Fargate is a service that developers can use to run containers without having to provision, configure, and maintain servers. This allows the developer to focus on the application’s core business logic. With AWS Fargate, we would be able to run CoTURN in a container with a public IP address within a public subnet.
To address scalability, we first needed to determine how many concurrent P2P sessions one instance of a CoTURN container could support. We considered the CPU and RAM available to an instance of a CoTURN container, and estimated that such an instance could handle up to 25 concurrent2 media relaying sessions. However, not all sessions require a TURN server; recall only 8% of P2P connections do, while the other 92% can be handled by a STUN server.
If 25 concurrent sessions represents 8% of P2P calls, then one instance can support around 310 total P2P concurrent sessions.
Therefore, an ideal scenario for auto-scaling would be to have at least one instance running at all times and to scale depending on the number of concurrent P2P sessions. Luckily, AWS Elastic Container Service (ECS) does just that.
AWS ECS is a fully managed container orchestration service. Otter’s STUN/TURN stack is an ECS Cluster of CoTURN containers. A service is configured to always maintain at least one instance within the cluster and to increase or decrease the number of instances depending on a target CPU utilization (i.e. 75%) within the cluster.
Given that the cluster may have multiple instances of CoTURN running, a new component was needed to direct incoming traffic within the cluster. We used a network load balancer to fulfill this task. Clients are only aware of the network load balancer endpoint. The ECS Service can scale as needed.
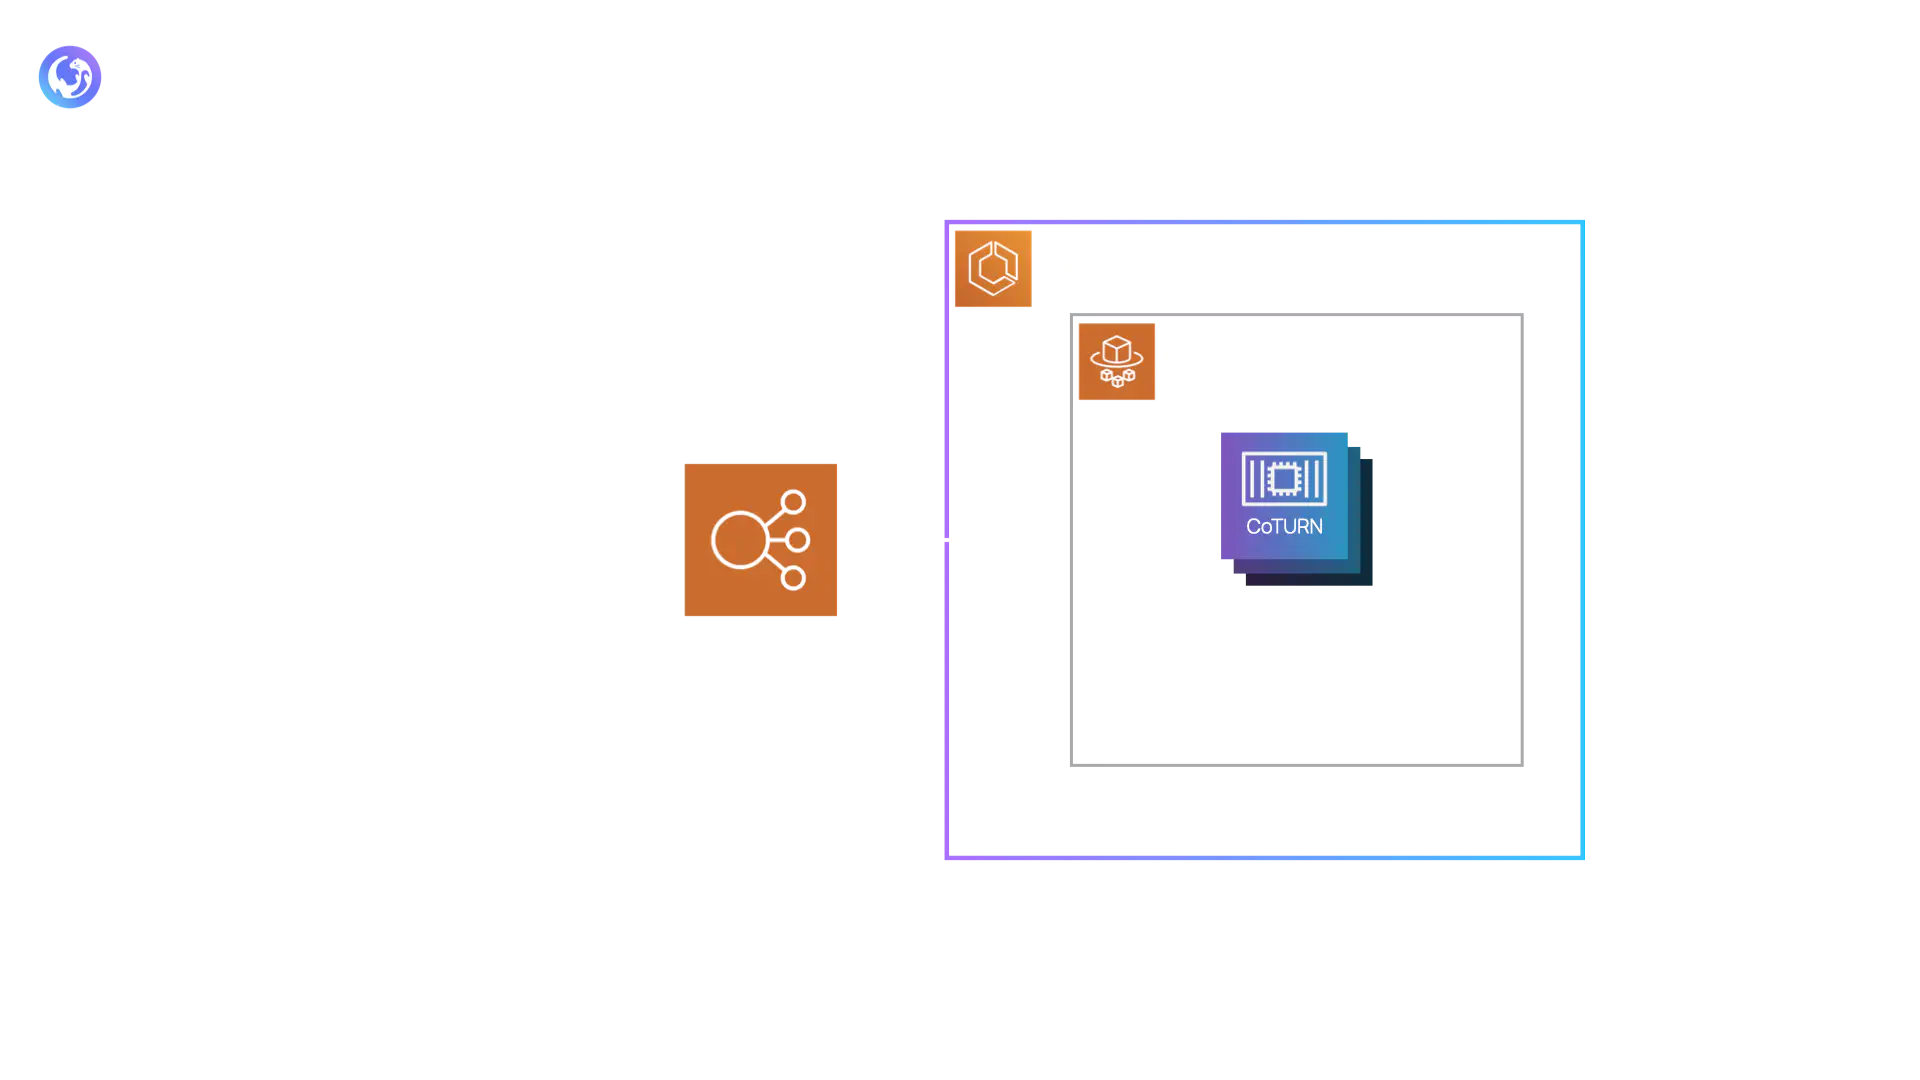
The above infrastructure has its merits, but it also has the following drawbacks:
- There is a steep learning curve to get started with ECS as there are many different concepts involved (i.e. task definition, cluster, service discovery, health checks, etc).
- Fargate is generally more costly and less flexible than running the equivalent software on an EC2 instance.
- Monitoring and observability remain challenging with Fargate as containerized code is not easily accessible.
Given the above downsides were not significant impediments to our application, it made sense to use ECS with Fargate for CoTURN.
The other competitive option to using Fargate would have been to deploy CoTURN on an EC2 instance. However, that would have involved maintenance of the virtual machine, something that Otter aims to avoid.
The Frontend Stack
By this point, we have fulfilled the objective of setting up infrastructure to facilitate video calling. However, to use this infrastructure to host video calls, a developer would still have to interact with the WebRTC API to design, test and deploy their own frontend video calling application. In addition, a developer would need to host this frontend video calling application.
The purpose of the Frontend stack is to abstract away this complexity by providing and hosting the Otter Web App. The Otter Web App consumes two resources from the API stack (next stack discussed) that allow it to connect and plug into the infrastructure provided by the Signaling stack and STUN/TURN stack. The Otter Web App interacts with WebRTC API to handle offers, answers and set up connections between peers. Using these connections, peers can process video streams, share files and instant messages. When a user attempts to visit a link (generated using the API stack), the user will be served the Otter Web App, which will automatically join the video call associated with the given link (similar to how Google Meet works).
The hosting of the Otter Web App is accomplished using AWS Cloudfront (a Content Delivery Network), which distributes a website hosted in an AWS S3 bucket. While we considered a web server, we chose Cloudfront and S3 for several reasons. A web server seemed like overkill since the same static website is served for each request. Additionally, Cloudfront distributes content from edge locations that are closest to the end user, which can reduce the latency that the user experiences when loading the site.
The building of the Otter Web App was accomplished using an EC2 instance, but this presented a new set of challenges which will be discussed later.
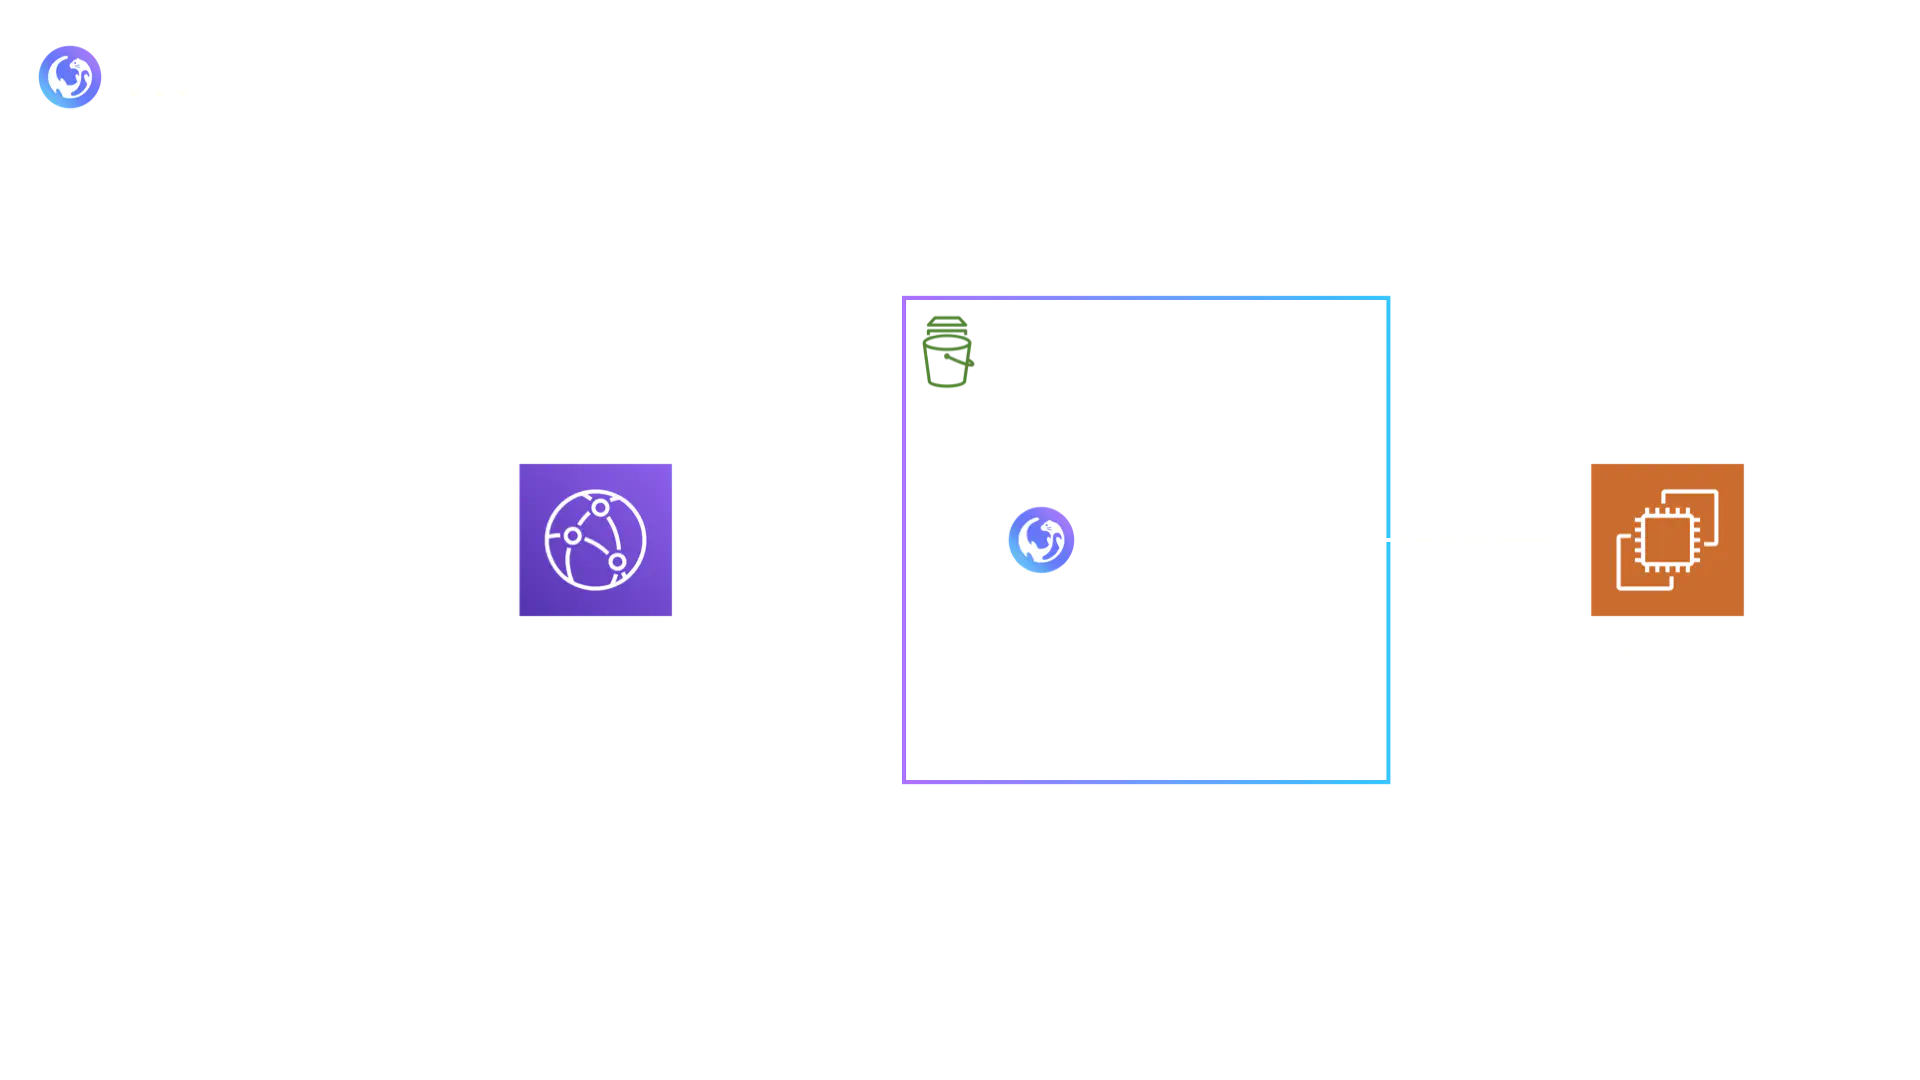
The API Stack
The API stack serves two purposes. First, it provides an easy way for developers to integrate Otter into their applications. This is achieved through a single route, namely /createRoom. Second, as we alluded to in the Frontend stack, it exposes resources that are consumed by the Otter Web App. This is achieved through two routes, namely /room/{id} and /credentials.
The /createRoom route allows a developer to issue an HTTP POST request in order to create a uniquely identifiable room resource. The room resource represents a virtual P2P session that will be hosted on the Otter Web App. The route performs the following tasks when triggered:
- Creates the room resource and stores relevant meta-data into DynamoDB.
- Generates a unique URL that points to a Cloudfront Distribution where the Otter Web App is hosted.
- Appends the URL to the response body which is sent back to the developer.
It is important to understand that this URL is bound to the room resource it was generated for. In other words, consuming the /createRoom endpoint is the only way to have a virtual P2P session hosted on the Otter Web App. A developer who uses Otter should only have to think about how to integrate this route into his own web application. Everything else is self-contained within Otter.
The two additional routes that the API stack provides, /room/{id} and /credentials, are consumed by the Otter Web App. The /room/{id} route fetches the meta-data of the associated room resource whereas the /credentials route fetches the time-limited credentials to access the functionality provided by the STUN/TURN stack. Once loaded, the Otter Web App issues a request to both routes in order to gather all the information required to start the virtual P2P session.
In short, the life cycle of a P2P session includes the following 5 API calls:
- One API call (/createRoom issued by an end user) to create the room resource.
- Two API calls (/room/{id} issued by the Otter Web App for each peer) to fetch the room’s metadata.
- Two API calls (/credentials issued by the Otter Web App for each peer) to fetch the STUN/TURN stack credentials.
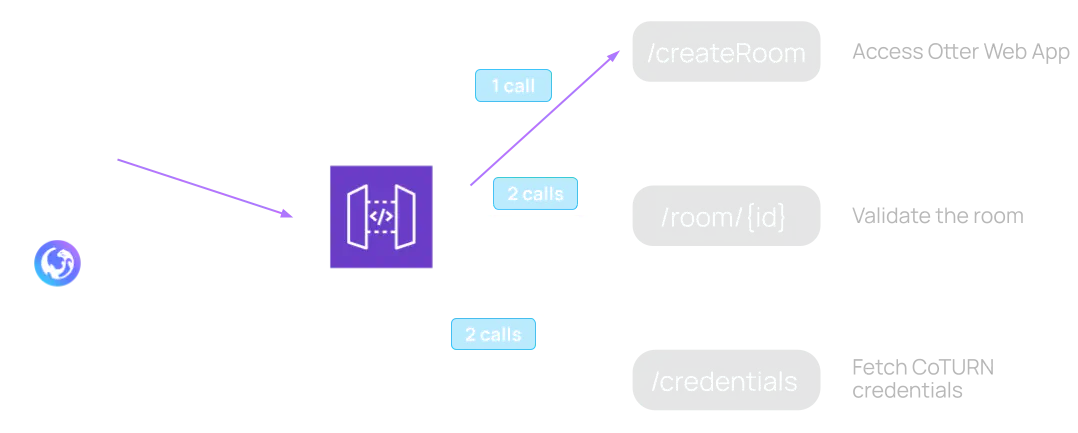
Once the virtual P2P session has begun, all further traffic either flows directly between the peers or through the Signaling stack. It therefore did not make sense to have a server running at all times to handle these API calls. For every new virtual P2P session, the /room/{id} and /credentials routes will receive twice as much traffic as the /createRoom route therefore indicating a different computing need. Identifying these different needs allowed us to deploy an infrastructure that provides on-demand execution.
AWS Lambda not only provided us with this on-demand execution but also with minimal maintenance. This characteristic aligns with the drop-in nature of the Otter framework. Furthermore, AWS Lambda functions are also able to handle heavier traffic without any manual intervention. Since each session requires 5 API calls, this auto-scaling feature could become valuable when many virtual P2P sessions are initiated within a short period of time.
The API stack is thus composed of three distinct AWS Lambda functions, one for each route described above. The functions are connected to a DynamoDB database where the room resources are persisted. Furthermore, to have a single point of contact for these three different routes and to properly manage the communication between the client and the AWS Lambda functions, we deployed an AWS HTTP API Gateway in front of the functions. Therefore, all API calls are sent to the HTTP API Gateway which takes care of routing them to the appropriate handler.
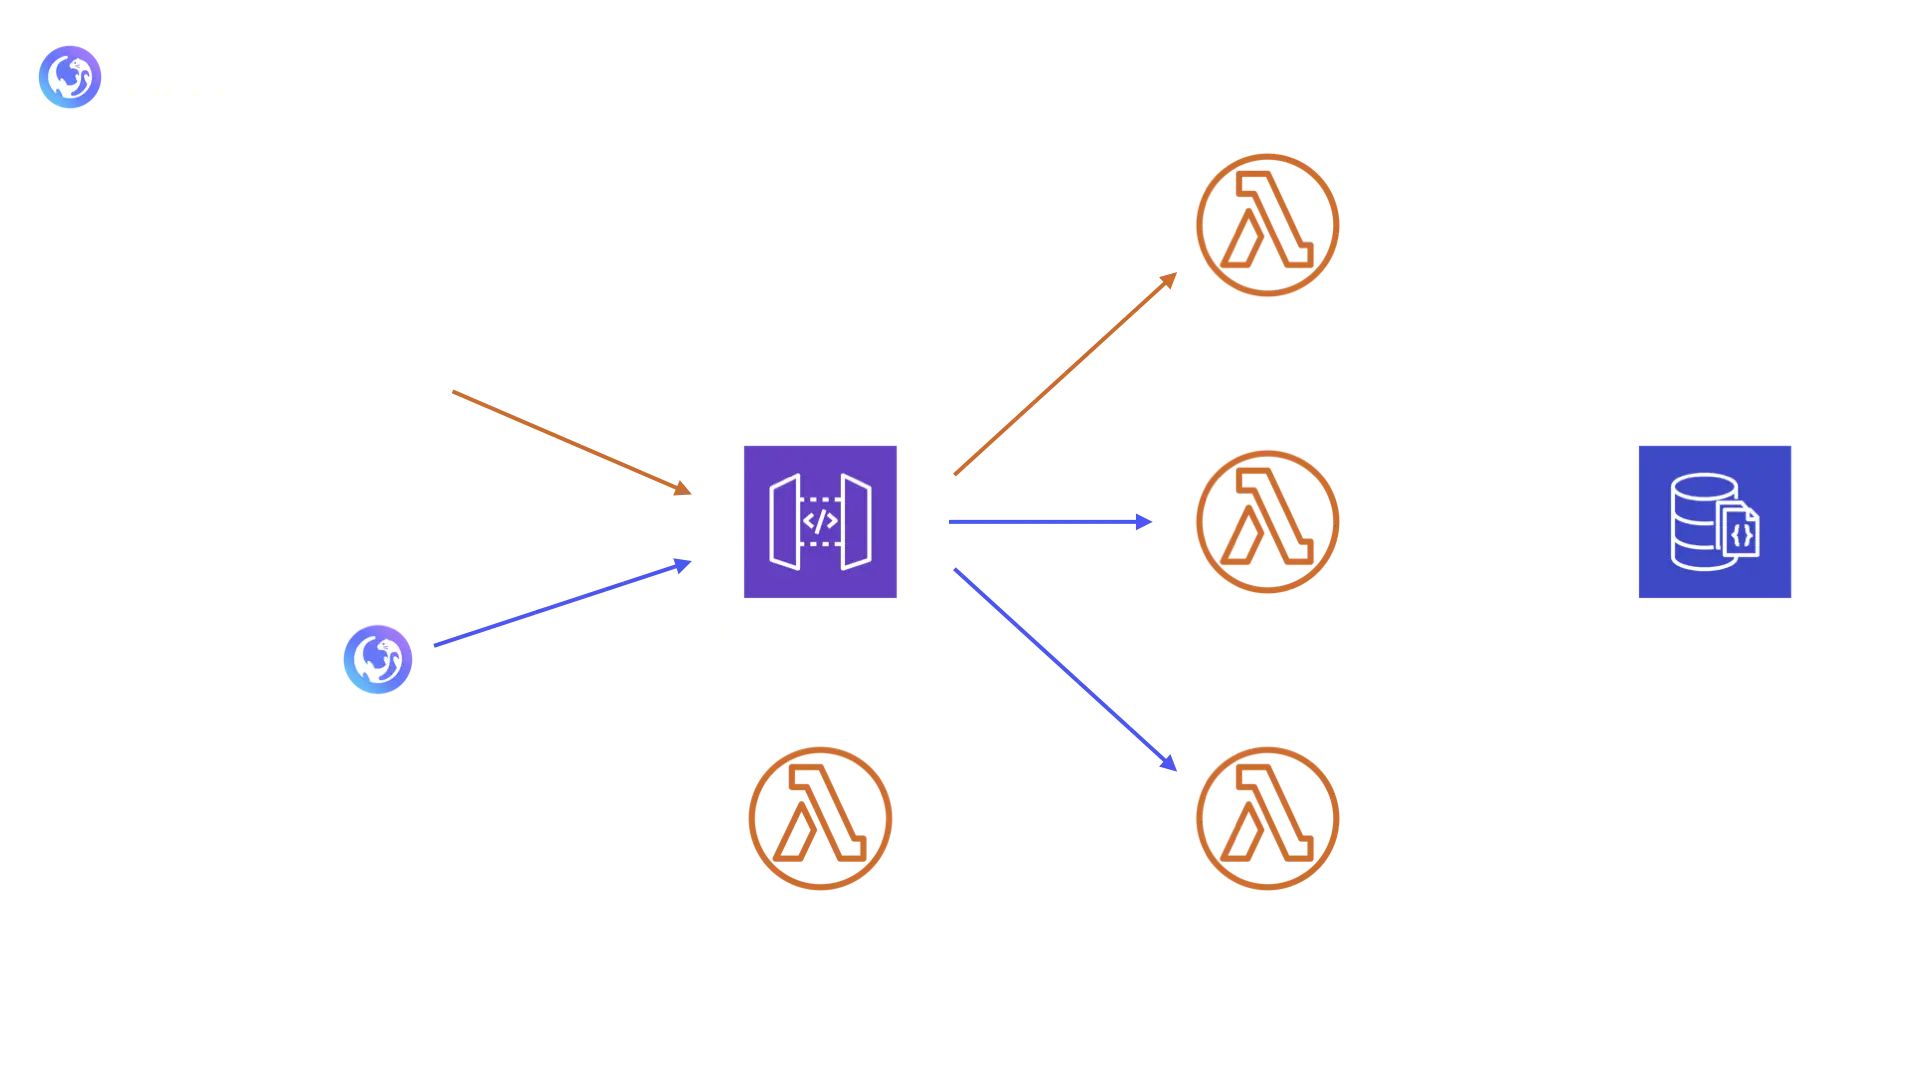
Finally, we also have a Lambda Authorizer function attached to the gateway to control the access to the resources. We will explore the implementation of this authorizer within the Engineering Challenges section.
Architecture Summary
In summary, we segmented our architecture into stacks (the Signaling stack, the STUN/TURN stack, the Frontend Stack, the API stack) that together fulfill three objectives:
- Provisioning the infrastructure to support video calling.
- Abstracting away the complexity of interacting with this video calling infrastructure.
- Allowing developers to integrate Otter into their applications.
The system altogether looks like the following:
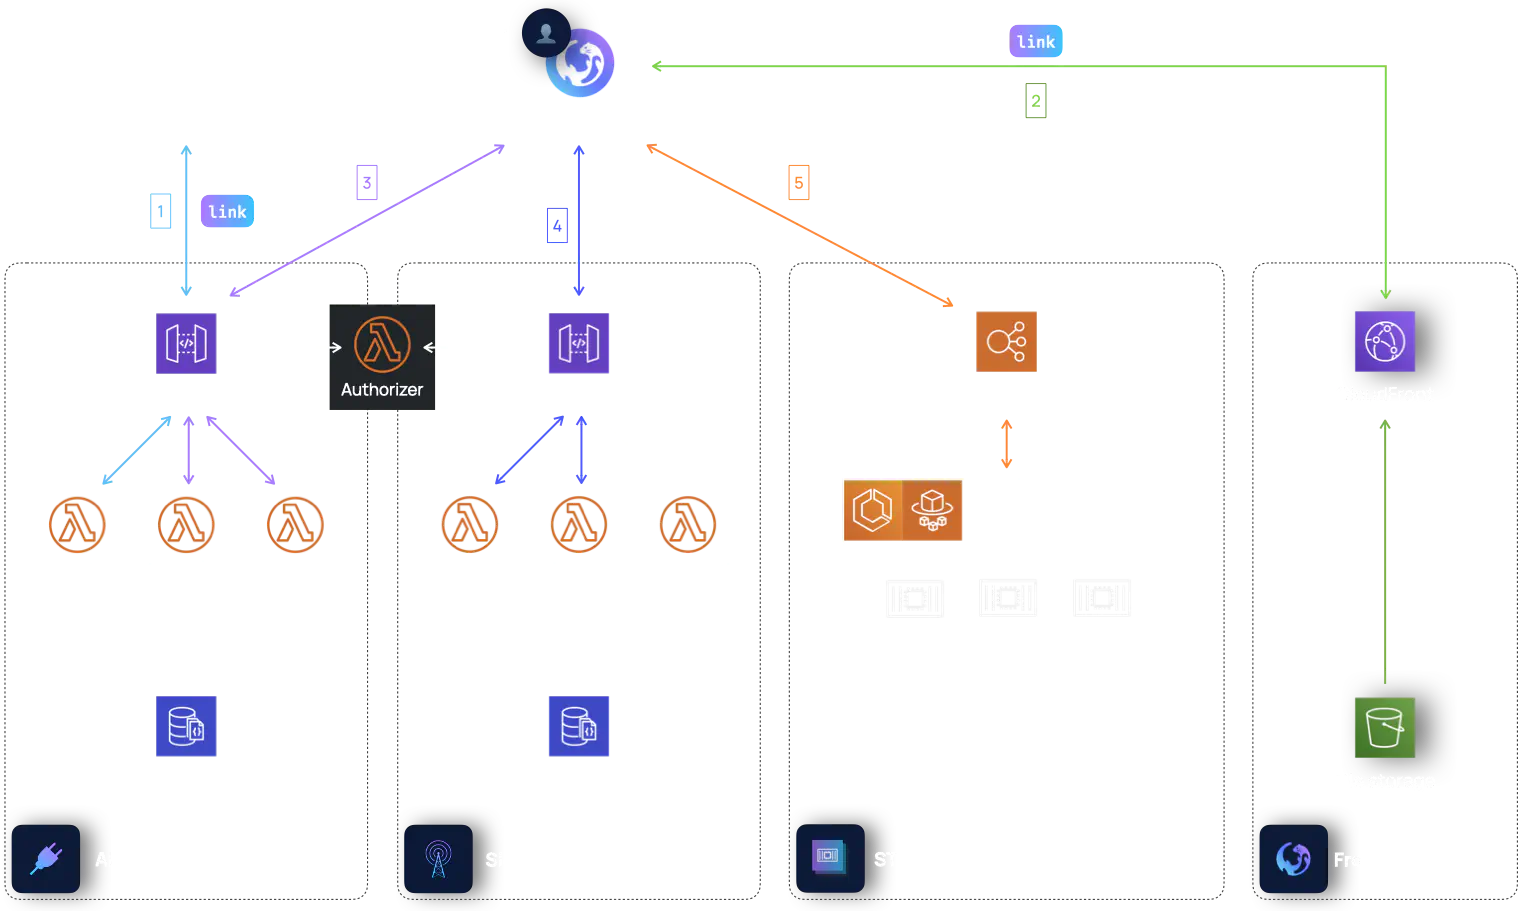
Referring to the above diagram, the workflow of establishing a Otter video call after the infrastructure has been deployed is as follows:
Create room resource: The developer adds functionality (ie a button) which sends a POST request to the /createRoom resource and a room link is generated and sent to the user.
Load Otter Web App by visiting the room link: The Otter Web App is served from CloudFront.
Validate room, get TURN credentials: The Otter Web App validates the room with a GET request to the /room/{id} resource and fetches the CoTURN credentials with a GET request to the /credentials resource.
Connect with signaling server: The Otter Web App establishes a connection to the API WebSocket gateway.
Request public IP address candidates: The Otter Web App starts gathering candidate IP addresses to send as messages to exchange offers and answers.
Now the video call between peers can commence.
Otter not only reduces the overhead involved in the deployment and integration of the resources in the diagram above but also of these resource’s associated roles, policies, security groups, etc. In total, Otter ends up saving the developer over 100 steps with the creation and integration of all of these AWS resources and their associated entities.
Notes
Defining “real-time” could be an entire separate discussion. Here, real-time means anything less than 100ms, since this latency generally is low enough to be unnoticed by humans; 1968 Paper by Robert Miller. ↩︎